S-Chess Endings 4

My article this month is dedicated to Noam D. Elkies. He inspired me greatly by cooking my Elephant study. In my first Endgame article I gave the following study and comments: "What is interesting is that the Elephant can win against the Rook without necessarily "forcing" the defender to the last rank. The diagram position features the pattern that I have in mind:

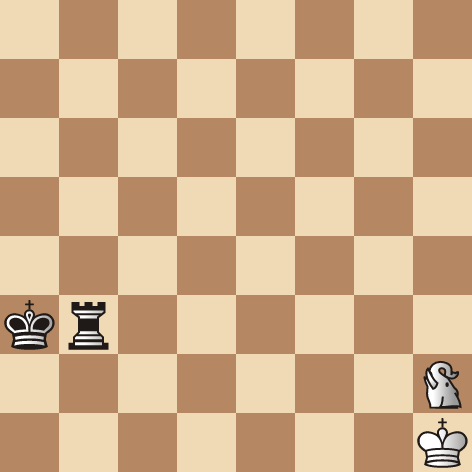
Study Seirawan 2007
White to play and win
The study has a double twist. White is to mate Black on both the a1 and a8-squares. The pattern is amusing. Before reading onwards and seeing the solution, set up the diagrammed position on your chess board and see if you can solve it."
White starts with a check: 1.Ec2+ Ka4 2.Ec4+!, Black is forced to interpose his Rook as the King move 2…Kb5 leads to 3.Ed4+ forking and winning the Rook: 2…Rb4 3.Ec3+!, repeating the pattern and driving Black's King to towards the a8-square: 3…Ka5 4.Ec5+! Rb5 5.Ec4+! Ka6 6.Ec6+ Rb6 7.Ec5+ Ka7 8.Ec7+ Rb7, as we've seen in case of: 8…Kb8 9.Ed7+ forks King and Rook, 9.Ec6+ Ka8, mission accomplished. Now the mate is but two moves away: 10.Ec8+ Rb8, a forced interposition, 11.Ec7 checkmate!
Remarkable. White is able to force a checkmate without the involvement of his King. Put the study on your board once more and now try to force a checkmate on the a1-square… Here the trick is to remember that White's King is on the h1-square so that a twist in the pattern is needed: 1.Ec2+ Ka4 2.Ec4+ Rb4 3.Ec5+!, a reversal of the previous pattern. Now our goal is to drive Black's King to the a1-square: 3…Ka3 4.Ec3+ Rb3 5.Ec4+ Ka2 6.Ec2+ Rb2, as we've seen 6…Kb1 7.Ed2+ would cost Black his Rook. 7.Ec3+ Ka1, mission accomplished. Now we have to pause to think. Previously our pattern told us that, 8.Ec1+ Rb1 9.Ec2 would deliver checkmate. However, this pattern would be tragic: 8.Ec1+?? Rb1!. pins the Elephant to White's King! So White adjusts the pattern: 8.Ea3+! Ra2 9.Eb3 checkmate.
I found myself enchanted by these patterns…"
Noam D. Elkies pointed out two beautiful stalemate ideas that cook my intended solutions: 1.Ec2+ Ka4 2.Ec4+ Rb4 3.Ec3+ Ka5 4.Ec5 Rb5 5.Ec4+ Ka6 6.Ec6+. this is the moment that Noam points out that Black has the beautiful resource: 6…Kb7!!, when the intended win by 7.Ed6+, is undone by the move: 7…Ka8!, and if the Rook is captured: 8.Exb5, a stalemate is created. Noam also points out that the pattern can be repeated in case White tries a checkmate on the a1-square: 1.Ec2+ Ka4 2.Ec4+ Rb4 3.Ec5+ 4.Ec3+, and now again the pattern is flipped: 4…Kb2! 5.Ed6+ Ka1!, as before, if the Rook is captured: 6.Exb4, again a stalemate is produced. I was delighted by these two cooks enjoying the patterns created immensely.
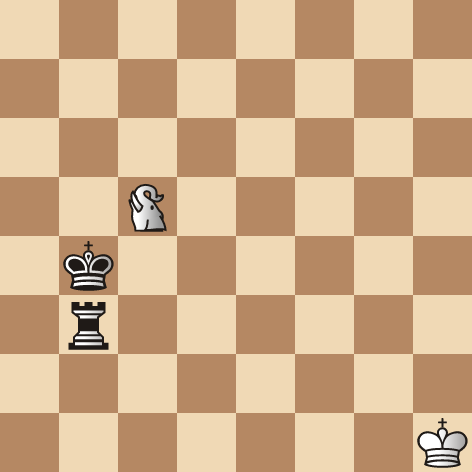
Noam however was not finished. Once again we start with the original study and he found a winning solution after all:
"Meanwhile, while pondering the position again a day or two later, I noticed that White seems to win after all with a different checking sequence: 1.Ec2+ Ka4 2.Ec5+! Kb4 (or 2…Ka3 3.Ec4+ transposing)

3.Ee4+! Now 3…Ka3 allows 4.Ec4+ Ka2 5.Ec2+, when Black no longer has the stalemate trick and is either fatally forked after: 5…Kb1 6.Ed2+ or mated after: 5…Rb2 6.Ec3+ Ka1 7.Ea3+! (Ec1+?) Ra2 8.Eb3, checkmate. While 3…Kb5 allows the familiar fork 4.Ed4+, and 3…Ka5 4 Ec4+, gives Black the Hobson's choice between the same fork and 4…Ka6 5 Ec5+, winning.
As you can imagine I was elated with the cooks as well as the save! The study has been vastly improved thanks to Noam's work. But he wasn't done. He offered the following for consideration:
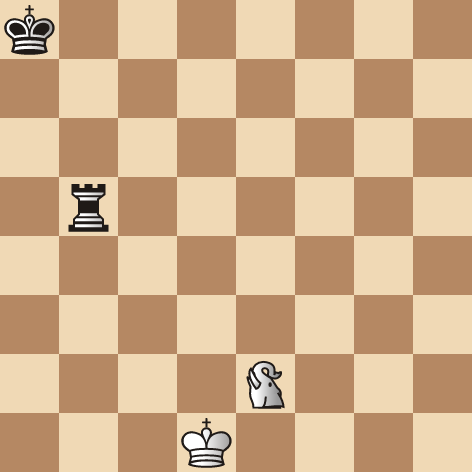
"I suspect now that this King + Elephant versus King + Rook ending must be generally won by the Elephant side, because even without the White King there are so many forking possibilities. An amusing example:"

Study Noam D. Elkies 2007
White to play and win
"If: 1.Ee8+ Kb7 2.Ed6+ Ka8, and again White is stymied at least for in the short term by the stalemate defense. But the non-checking move: 1.Ec3, wins. The threat is not 2.Exb5? but 2.Ea3+; even that's only a phantom threat, because any Black move parries it, but wherever he goes Black either gets forked or falls into that systematic-mate line:
1…K-any 2.Exb5+
1…Ra5(e5) 2.Ec7+ Kb8 3.Ec6+
1…Rf5(h5) 2.Ec7+ Kb8 3.Ee8+ and 4.Eg7+
1…Rg5 2.Ec7+ Kb8 3.Ed7+ Kc8(a8) 4.Ef8+, and 5.Ef7+ (or 5.Eh7+)
1…Rb8 2.Ec7#
1…Rb7 2.Ec8+ Rb8 3.Ec7#
1…Rb6 2.Ec7+ Kb8 3.Ed7+
1…Rb4(b2) 2.Ea2(a4)+
Some lines have alternative conclusions, e.g. 1…Rb4 2.Ec7+ and 3.Ec6+." Noam D. Elkies
Talk about a Kasparian domination theme! How about that one? Very nice indeed. Thank you very much Noam D. Elkies! I couldn't have written this article without your help. Smile.