S-Chess Endings 1

In my book, "Winning Chess Endgames," I quoted a dear late friend of mine, Michael Franett, three-time Washington State Champion, "Studying the Ending is like cheating." His point being that if you play chess you are going to get to an endgame. You might as well learn the endings in advance so that you will be prepared when they inevitably arise. Additionally, a primary benefit of learning endings is that it helps you better understand the values of the pieces on an open board. To many beginning players, a bishop may seem as strong as a rook. Take a look at a few Bishop versus Rook endings and suddenly it becomes crystal clear why a Rook is stronger in the endgame. Endgame study also helps you learn how the pieces coordinate with one another and how to best oppose a superior force. Being a pawn down in a Rook ending is no fun but if you know how to draw such positions, you will become a fearless defender.
Equally, if a player learns that a Bishop and wrong colored h-pawn or a-pawn is a draw, a player might be able to use this knowledge to save a hopeless looking endgame or even middle-game.
In Seirawan Chess I haven't yet formed an opinion of the numerical values of an Elephant or a Hawk as it will take a lot of practice to sort out their value. We can get a better insight in determining their values by seeing how they fare in the endgame. Let us start by looking at a simple basic end-game position.
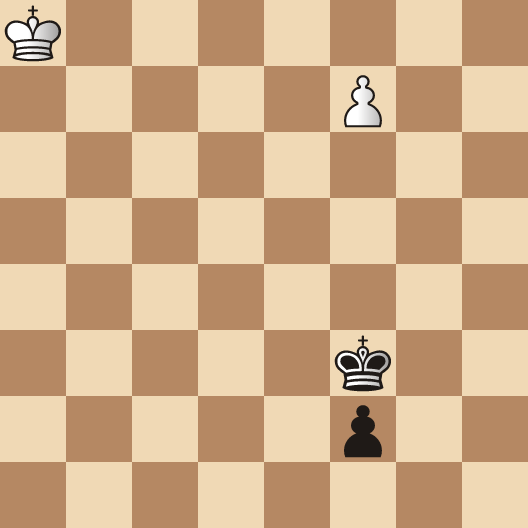
White to play and win
While the Queen is the toast of all beginner players the diagrammed position represents a low blow to her majesty. If White begins with: 1.f8=Q+ Kg2, Black achieves an immediate draw. In fact, in such endings where the defending King escorts a passed pawn to the seventh or second ranks, the Queen has a terrible time against the a, c, f and h-pawns. In Seirawan Chess, the diagram represents a simple win for White. In fact, remarkably enough, White's King isn't needed at all as White forces the win of Black's pawn.
We start: 1.f8=E+! The Elephant is an absolute killer against a passer on the seventh: 1…Kg3 2.Ef5+ Kg2 3.Eg5+ Kf1, Black has no choice. If, 3…Kh1 4.Eg3+ Kh2 5.Eg4+, forks King and pawn. The pawn is captured with check on the next move. White could now pause to bring his King near but he continues the chase: 4.Eg3+! Ke1 5.Ee3+! Kd2, Black's moves have all been forced. Now with: 6.Ee4+, the King and pawn are forked and the pawn is captured. Put any pawn on the 7th rank and practice against an Elephant. You will quickly realize that against any pawn the Elephant wins easily. This knowledge helps us understand that in these types of endgame positions an Elephant is much stronger then a Queen. Hence, the discovery that in such positions an Elephant outshines the Queen gives us a hint that the Elephant's value is comparable to the Queen.
An ending that has given everyone fits at one time or another is King & Queen versus King & Rook. Computer endgame table-bases have shown that this ending once considered an easy win is much more difficult when the opponent is a computer. (In passing, I should like to make a footnote worth keeping in mind: In Capablanca's game when the original 10 x 10 board was reduced to a 10 x 8 board the ending King & Queen versus a King & Rook would have been far more difficult to win as the extra two files would have meant that when the Rook moves "far away" there would be two extra files to run away. Just another reason why we should all thank the gods for an 8 x 8 board.) A key question therefore is how will an Elephant fare against a Rook?
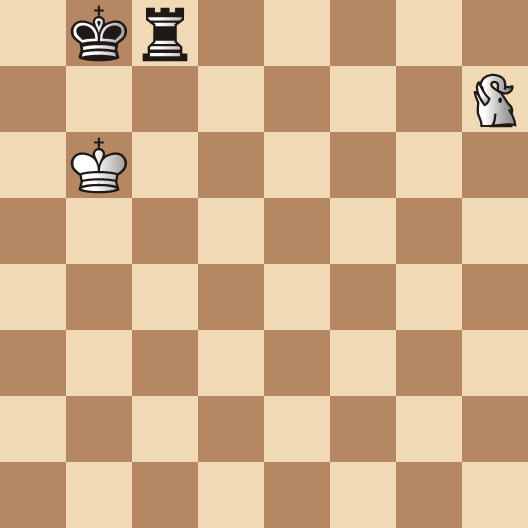
White to play and to win
In the diagram, I've set up White's ideal winning position. The following checkmating pattern is rather cute and quite surprising: 1.Ed7+ (1.Eb7+ is equally good.) 1…Ka8 2.Ea7+ Kb8 3.Ea6! Checkmate. It is this "retreating" move Ea7-a6 which is deceptive and easy to miss as such checkmating moves featuring a retreat are not common in orthodox chess.
While the diagrammed position tells us how such a position can be won, it doesn't tell us if it can be forced. In my mind's eye I can imagine that it will be quite difficult to push the defender's King back to the last rank where this graceful checkmating coup can be delivered. If we look again at the starting position, let us give the situation as Black to move. If Black starts with: 1…Rc1?. White is able to achieve the desired mating pattern in a flash: 2.Ef8+! Rc8 3.Ed7+ Ka8 4.Ea7+, with mate to follow. This series of ladder checks is well worth remembering.
This means that Black has to move his Rook along the back rank. Let us take a look at the various possibilities: 1…Rd8?, walks into a simple fork: 2.Eb7+! Kc8 3.Ec7+ (3.Ea7+ is equally good) 3…Kb8 4.Ec6+, forks King and Rook and is mate when the Rook is captured.
Equally simple are: 1…Re8? 2.Eb7+ (3.Ed7+ is equally good) 2…Kc8 (2…Ka8 3.Ec7+ forks King and Rook) 3.Ed6+, forks King and Rook. While, 1…Rf8? 2.Ed7+, forks King and Rook immediately.
Hence, White's only problem is how to meet: 1…Rg8!, the only "safe square" for Black's Rook. Once more it is that deceptive "retreating" move which is the key to White's victory: 1.Ed7+ (1.Eb7+ is equally good) 1…Kc8 2.Ea7+ Kb8 (A forced return. Otherwise, 2…Kd8 3.Ea8+ skewers the Rook.) 3.Ea6+!, the winning move: 3…Kc8 4.Ea8+, wins Black's Rook.
So, as we've seen, from the diagrammed position White wins regardless of which side is to move. What is interesting is that the Elephant can win against the Rook without necessarily "forcing" the defender to the last rank. The diagram position features the pattern that I have in mind:
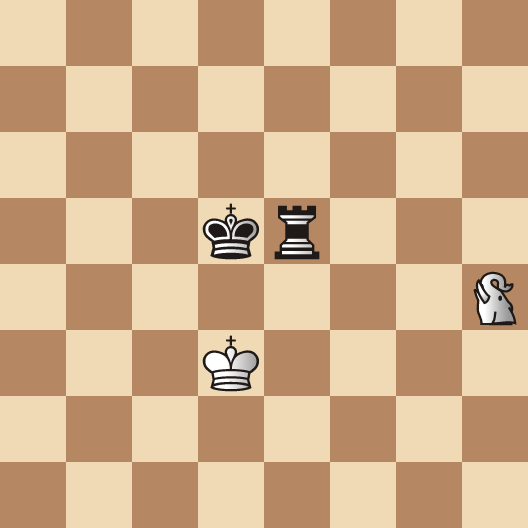
White to play and win
From our knowledge base in conventional chess it would seem that White has a lot of work to do in driving the Black King to the "back" rank or to the side of the board. The nice surprise is that White wins in a mere two moves. The key, of course, is to separate the King and Rook: 1.Ed4+! Kc5, forced, 2.Ed7+!, forking King and Rook.
The following is the first "study" I've ever created! I'm overly proud of this discovery as it brings a fine delight to those whom solve it.
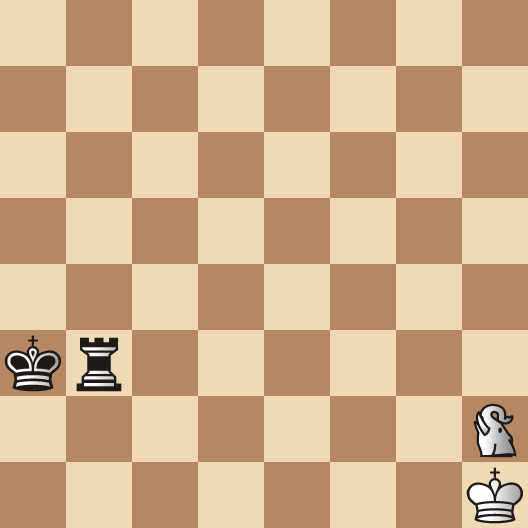
Study Seirawan 2007
White to play and win
The study has a double twist. White is to mate Black on both the a1 and a8-squares. The pattern is amusing. Before reading onwards and seeing the solution, set up the diagrammed position on your chess board and see if you can solve it.
White starts with a check: 1.Ec2+ Ka4 2.Ec4+!, Black is forced to interpose his Rook as the King move 2…Kb5 leads to 3.Ed4+ forking and winning the Rook: 2…Rb4 3.Ec3+!, repeating the pattern and driving Black's King to towards the a8-square: 3…Ka5 4.Ec5+! Rb5 5.Ec4+! Ka6 6.Ec6+ Rb6 7.Ec5+ Ka7 8.Ec7+ Rb7, as we've seen in case of: 8…Kb8 9.Ed7+ forks King and Rook, 9.Ec6+ Ka8, mission accomplished. Now the mate is but two moves away: 10.Ec8+ Rb8, a forced interposition, 11.Ec7 checkmate!
Remarkable. White is able to force a checkmate without the involvement of his King. Put the study on your board once more and now try to force a checkmate on the a1-square… Here the trick is to remember that White's King is on the h1-square so that a twist in the pattern is needed: 1.Ec2+ Ka4 2.Ec4+ Rb4 3.Ec5+!, a reversal of the previous pattern. Now our goal is to drive Black's King to the a1-square: 3…Ka3 4.Ec3+ Rb3 5.Ec4+ Ka2 6.Ec2+ Rb2, as we've seen 6…Kb1 7.Ed2+ would cost Black his Rook. 7.Ec3+ Ka1, mission accomplished. Now we have to pause to think. Previously our pattern told us that, 8.Ec1+ Rb1 9.Ec2 would deliver checkmate. However, this pattern would be tragic: 8.Ec1+?? Rb1!. pins the Elephant to White's King! So White adjusts the pattern: 8.Ea3+! Ra2 9.Eb3 checkmate.
I found myself enchanted by these patterns which quickly lead me to my second study. When it rains it pours!
Study Seirawan 2007
White to play and win
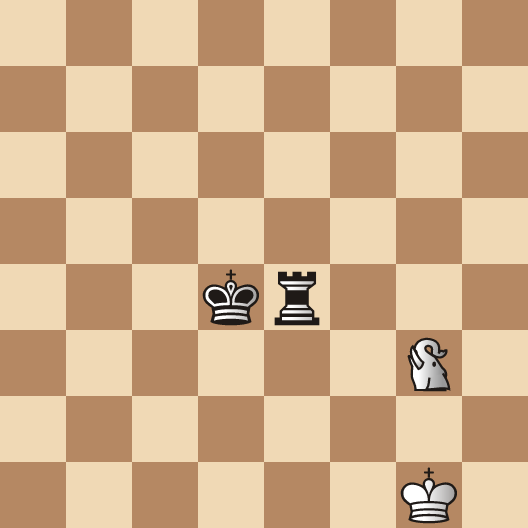
In this study, I didn't want to put Black's King at the edge of the board, rather I wanted to reveal the remarkable forking power of the Elephant and how it can drive the defending King around on an open board: 1.Ef5+ Kd3, the most difficult. Black would lose at once after: 1…Kc4?? 2.Ed6+!, forks King and Rook. While, 1…Kc3 2.Ed5+!, separates King and Rook and leads to the loss of the Rook: 2…Kc4 3.Ed6+ wins; 2…Kb3 3.Ec5+ wins; 2…Kc2 3.Ec5+ wins; 2…Kb2 3.Ed3+! Ka1, (3…Ka2 4.Ed2+ wins; 3…Kc2 4.Ec5+ wins as well as 4.Ef2+ winning;) 4.Eb3+ Ka2 5.Ed2+ wins. 2.Ed5+ Rd4, a forced interposition. If, 2…Kc2 3.Ec5+ wins; 2…Ke2 3.Ec3+ wins. 3.Ec5+ Ke3, Black's King keeps contact with his Rook. If: 3…Kd2 4.Eb3+ wins; 3…Ke2 4.Ec3+ Kd2/Ke1 5.Ef3+ wins. Now we start to see why White has checked in such a way, he wants to drive Black's King towards the White King: 4.Ee5+! Re4 5.Ed5+! Kf3, mission accomplished. Now the win is in sight: 6.Ed3+! Re3, otherwise 6…Kg4 7.Ef2+ wins; while 6…Ke2 7.Ec3+ or 7.Eg3+ wins. With the help of White's King Black's King and Rook are now separated, see the following Diagram:
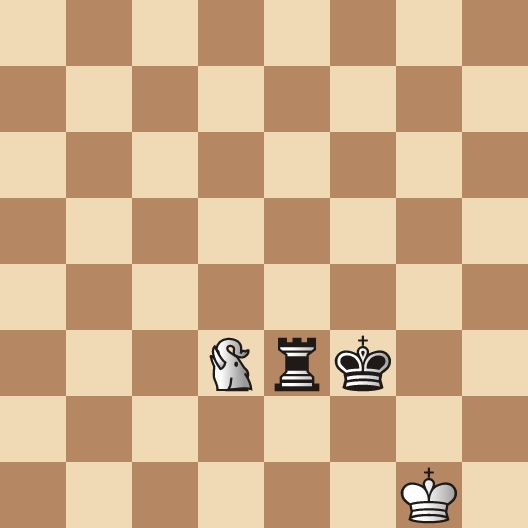
1.Ed4+!, forcibly separating King and Rook: 1…Kg3 2.Ef5+!, and wins.
Well, those examples with the Elephant versus a Rook were a mismatch. It raised the question how should the defender best try to hold? I'm not sure. It seems that when the King and Rook are in close contact, the defending King can be lead around the board and if it is forced towards the attacking King, the Rook is soon lost. Perhaps the best chance is to keep the Rook at a great distance away from the King, the opposite way of defending a Rook versus Queen ending. More study and practice are needed.
Let us see how the Elephant may fare against her majesty the Queen. We start with a simple tactic.
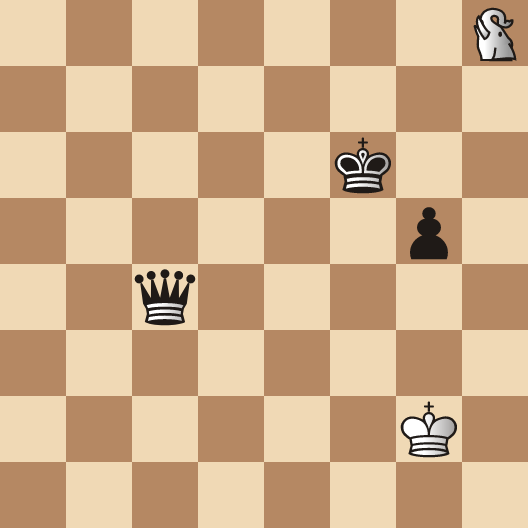
White to move and win.
Clearly, White's only chance of winning such a position is to fork the King and Queen. The winning move is therefore clear, White should not check the King towards the Queen but to keep them apart: 1.Ee8+!, White can choose three squares: 1…Kf7, 1…Kf5 are easy to meet with: 2.Ed6+, what is intriguing is that the same winning fork occurs after: 1…Kg6 2.Ed6+!, although 2.Ee5+ is equally good, this remarkable ability to fork on three squares, is what gives this particular example its charm. If from the diagram we remove the g5-pawn and allow, 1…Kg5 2.Ee5+ would be a winner. I put the g5-pawn on the board to show the fork on three squares.
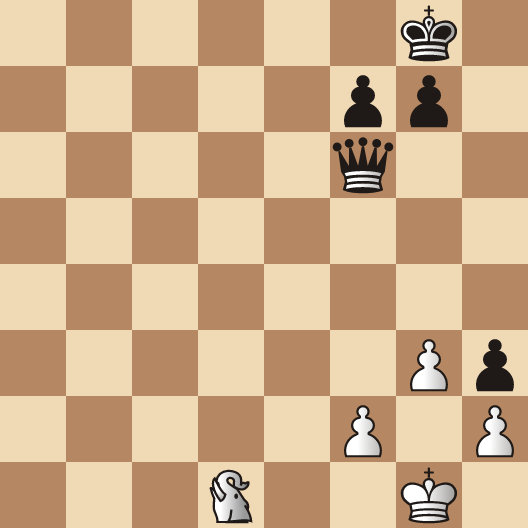
In our diagrammed position, everything appears quite normal. Black is pleased that he has advanced his pawn to the h3-square in order to create checkmating possibilities and he takes the opportunity to leap forwards: 1…Qf3??, with a double threat of capturing the d1-Elephant as well as threatening 2…Qg2 checkmate. How should White react? Take your time and try to work out the variations.
If you wanted to meet: 1…Qf3, by 2.Ee1, pat yourself on the back, you are a great defender! If you wanted to play: 2.Ed8+!, well done. You are a natural born attacker but double check those aggressive, greedy tendencies: 2…Kh7 3.Ef8+ Kh6 4.Eh8+, a pattern we are familiar with. Black's King is flushed out: 4…Kg5, the key moment. If you wanted to play, 5.Exh3+, you are a player after my own heart. Grabbing a pawn with check! What could be sweeter? Winning Black's Queen, that's what. Best is: 5.Eh7+!, leads to a line that forks Black's Queen in three ways. All the moves: 5…Kg6/Kf5/Kg4 are met by: 6.Eh4+!, winning Black's Queen. However, take a closer look at: 5…Kg4. What could be sweeter then winning a Queen? Checkmate in one! As, 6.Exg7 mate creates a nice type of "Epaulette Mate," with the h3 and f3-squares occupied.
Our next diagram is even more normal looking. This time Black is nursing an extra pawn, the one he just captured on the d5-square…
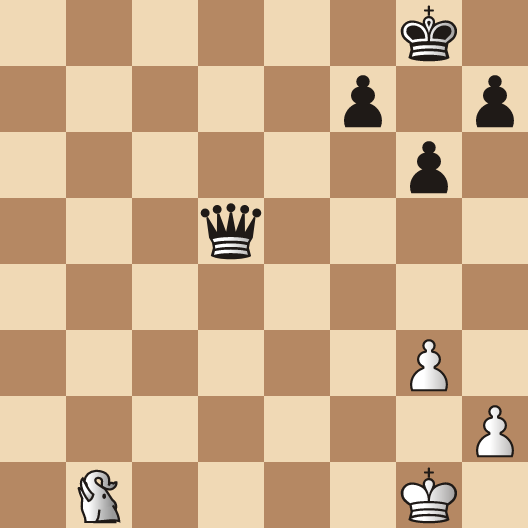
White to play and win.
Once again, the key to the win is to flush out the Black King and to recognize that Black's Queen is unprotected: 1.Eb8+ Kg7 2.Ee8+ Kh6 3.Eg8+ Kg5 4.h4+!, forcing Black's King to a forking square. If: 4…Kg4 or 4…Kh5, 5.Ef6+ wins. While: 4…Kf5 5.Ee7+, wins.
I hope you have enjoyed these preliminary insights into the strength of the Elephant. Next article #2, we'll look at the Hawk…